A.W.A.K.E. (All We Acquire thru Knowledge & Education) contains the following:
Disasters- an Overview
A disaster is a sudden, calamitous event that seriously disrupts the functioning of a community or society and causes human, material, and economic or environmental losses that exceed the community’s or society’s ability to cope using its own resources. Though often caused by nature, disasters can have human origins.
A disaster occurs when a hazard impacts on vulnerable people.
The combination of hazards, vulnerability and inability to reduce the potential negative consequences of risk results in disaster. Recovering from a disaster can be a slow process. Returning home, cleaning up, and repairing damage can be challenging and stressful. Personal safety and mental and physical well-being are primary concerns, and loss of property and money are also important. You should file insurance claims as soon as possible and know what to expect to reduce uncertainty. If help is available, knowing how to find it makes the process faster and less stressful.
3Ps (Prevention and Precaution, Preparation)
There are many benefits to planning ahead for disasters. The most important benefits are staying safe and helping yourself and your community recover. People and families that plan for emergencies will:
• Help keep people safe;
• Limit property damage;
• Know what to do during and after a disaster;
• Better manage their savings;
• Support community preparedness; and
• Help their community get back up and running after a disaster.
Taking simple actions to protect against disaster helps you, your family, your community, and your country in important ways. How to Prepare for Disasters?
To prepare yourself and your family for a disaster, you should:
1) Know Your Risks– Understand the risks you and your family may face. Most communities face many types of hazards. It is important to learn the risks specific to your home and the ways to assess your risks if you are away from home. Know how and when to take action before, during, and after different hazards.
2) Make a Plan– Make a communications plan and prepare for both evacuating and sheltering. Prepare for your family’s unique needs with customized plans and supplies. In addition, use your social networks to help friends and family members prepare and participate in communitywide disaster preparedness activities. Moreover, you should gather emergency supplies and secure the information and important documents you will need to start your recovery.
3) Take Action. Put your plan into action. Be ready and able to face disasters, no matter where you are and when they occur. It is important to get the insurance you need and understand your coverage options. Moreover, you should make a list of your personal property and its condition and protect your property by considering how to minimize damage. Practice your disaster plans, take advantage of existing alert and warning systems, and explore ways to serve your community.
People and families that plan for emergencies will:
• Help keep people safe;
• Limit property damage;
• Know what to do during and after a disaster;
• Better manage their savings;
• Support community preparedness; and
• Help their community get back up and running after a disaster.
Basic Protective Actions for all Disasters– There are proven measures or “protective actions” that you can take to protect your family and property before, during, and after a disaster. The better we as a Nation understand these measures, the more lives we can protect and save.
These important actions will help keep you prepared for all disasters:
Have the skills to assess the situation quickly and to take effective action to protect yourself.
Get involved with preparedness training and volunteer programs.
Put together an emergency fund of cash and supplies.
Decrease the potential impacts of hazards.
Prepare a family disaster plan and practice the plan.
Remember to be inclusive in your disaster planning and consider the needs of children, the elderly, and those with disabilities or access and functional needs. Also, be sure to consider the transportation needs for you and your family, recognizing that a disaster may impact normal route and transportation methods. Finally, you should also make sure to plan for your pets and service animals, which are frequently overlooked in disaster planning.
Many disasters happen with little or no warning. You need to be ready with the appropriate skills and knowledge to act immediately—often before you have instructions from authorities. After an event, it is important to first assess the situation before deciding to stay or change your location.
Taking simple actions to protect against disaster helps you, your family, your community, and your country in important ways.
Emergency and Disaster Preparedness
Disasters disrupt thousands of lives every year, leaving behind lasting effects on people and property. After a disaster, many others in your community need help as well. For this reason, local first responders and other assistance may not be able to reach you right away. You and your family can take simple steps now to prepare for emergencies. By doing so, you take back control even in the uncertainty of disaster. This comprehensive guide will provide you with detailed information on how best to prepare for disasters within your family and in your community. In this document you will learn general disaster preparedness tips for before, during, and after disasters, as well as best practices to inform your preparedness decisions about specific disasters, such as hurricanes, earthquakes, and active shooters.
Key Protective Actions for Specific Hazards
The protective actions that you should take differ depending on the hazard. Below are some key actions to take to protect yourself and your family from specific hazards.
If you see something or someone who is acting suspicious, report it to local law enforcement.
Run, Hide, or Fight. You may need to use more than one option.
−Run. Getting away from the shooter(s) is the top priority. If safe to do so, warn others nearby and call 9-1-1. Describe each shooter, their locations, and weapons.
−Hide. If you cannot get away safely, find a place to hide. Get out of the shooter’s view and stay quiet. Silence your electronic devices, lock and block doors, close blinds, and turn off the lights. Do not hide in groups—spread out along walls or hide separately. Try to communicate with police silently— such as through text messages or by putting a sign in an exterior window.
−Fight. As a last resort, defend yourself. Commit to your actions and act aggressively to stop the shooter.
Take a training course to learn first aid skills, including how to stop bleeding and perform CPR (cardiopulmonary resuscitation). Learn how to help others at Ready.gov.
Make an emergency plan for places you visit often and practice that plan.
Identify two nearby exits each time you visit a building.
Map out places to hide. Good hiding places include: rooms without windows, behind solid doors with locks, under desks, or behind heavy furniture.
Keep hands visible and empty.
Know that law enforcement’s first task is to end the incident. They may have to pass injured persons along the way.
Follow law enforcement’s instructions and evacuate in the direction they describe.
Always travel in pairs. Use a guide familiar with the area.
Take a training course to learn how to identify hazardous conditions, places to avoid, and the right way to use safety and rescue equipment.
Sign up for alerts on current avalanche danger, snowpack, and mountain weather conditions.
Watch for signs of increased danger, including recent avalanches and shooting cracks along slopes.
Avoid areas of increased risk like slopes steeper than 30 degrees or areas downhill of steep slopes.
Wear a helmet to help reduce head injuries and an avalanche beacon to help others locate you.
Carry a collapsible avalanche probe and a small shovel to help rescue others.
If an avalanche buries your partner or others, call 9-1-1 and then begin to search.
Treat others for suffocation, hypothermia, traumatic injury, or shock.
Keep software and operating systems up-to-date.
Use strong passwords and two-factor authentication.
Watch for suspicious activity. This could be any message that asks you to complete a task immediately, offers something that seems too good to be true, or asks for personal information.
Use encrypted (secure) internet communications.
Have antivirus and firewall solutions to block malware and other threats.
Regularly back up your files in an encrypted file or encrypted file storage device.
Limit the personal information you share online. Change privacy settings and deactivate location features.
Protect your home network by changing the administrative and Wi-Fi passwords regularly.
Drop, Cover, and Hold On
−Drop to your hands and knees to minimize injuries from falls, and minimize movement to avoid debris— walking or running makes you vulnerable to moving, flying, or falling objects.
−Cover your head and neck with your arms and other objects. If sturdy furniture is nearby and you are able to crawl there without going through debris, cover under sturdy furniture to protect your body, and cover your head and neck with your arms and other objects.
−Hold on to stay covered during shaking.
Secure household and workplace items and appliances (bookshelves, light fixtures, mirrors, televisions, computers, refrigerators, etc.) to protect against falling debris.
Strengthen home and workplace structures based on a professional review to prevent possible damage from falling debris and buildings.
Do not run outside. If indoors, stay there until the shaking stops. If in bed, stay there and cover your head and neck with a pillow.
If in a vehicle, stop in a clear area that is away from buildings, trees, overpasses, underpasses, or utility wires. If near slopes, cliffs, or mountains, be alert for falling rocks and landslides.
If you are in a high-rise building, expect fire alarms and sprinklers to go off. Do not use elevators.
After the shaking stops, if you are in a damaged building and there is a safe way out through the debris, leave and go to an open space outside. Do not go back inside until an authority figure tells you it is safe.
Expect aftershocks to follow the largest shock of an earthquake sequence.
If you are trapped, send a text or bang on a pipe or wall. Cover your mouth for protection and instead of shouting, use a whistle.
If you are in an area prone to tsunamis, go inland or to higher ground immediately after the shaking stops.
Stay indoors in a place with working air conditioning.
Know methods for reducing heat impact. Use shades to block sun, wear light-colored and loose fitting clothing, and stay hydrated to reduce heat impact.
If outdoors, seek shaded areas. Wear a wide brimmed hat to protect your face from the sun. Avoid overexertion and physically demanding activity, especially during the warmest times of the day.
Never leave a child, adult, or animal alone inside a vehicle on a warm day.
Check on your family and neighbors.
Know and watch the signs of heat-related illnesses. Watch for cramps, exhaustion, and heatstroke. Learn quick treatment options and when to get medical help.
Extremely high body temperature, skin that is hot and red, dizziness and confusion, and a rapid and strong pulse are all heat stroke symptoms and may be a medical emergency. Call 9-1-1 or get the victim to a hospital immediately. Do not give the person anything to drink. Cool the person by removing their clothing and moving to a cooler environment. Try a cool bath, sponging, ice packs, or wrap in cold, wet sheets. Use fans and air conditioners, if available. Watch for breathing problems until emergency medical personnel arrive.
Financial Preparedness
Safeguard important documents. Gather financial, household, and medical documents using the Emergency Financial First Aid Kit (EFFAK) as a guide to assist in securing critical information. Download a copy of the EFFAK from FEMA.gov.
Save money for a rainy day. Saving money and maintaining an emergency fund are smart practices that put you in a position to help yourself, your loved ones, and your community after a disaster. Set aside a certain amount of money each month or each pay period to add to your emergency reserve. You can use this reserve to help pay for rental, home, and/or flood insurance, and to purchase life-saving items like food, shelter, and water in an emergency.
Establish a cash-in-hand reserve. During disasters, you may experience extended power outages, the closing of banking institutions and limited or no access to credit cards and ATMs. To be prepared, you should keep cash on-hand in an easily- accessible but secure location. Keep a mixture of bills including ones, fives, and tens, with the highest bill being a twenty, to eliminate the challenge of finding change during an emergency.
Know your insurance coverage. Having insurance for your home, apartment, or business will help you repair, rebuild, or replace damage that occurs during a disaster. Review your insurance policies periodically and make sure they cover your needs. Your coverage may need to include additional policies for floods, earthquakes, water damage, tornadoes, or high winds in hurricane-prone areas. Learn more at FloodSmart.gov.
For additional resources and information, read the accompanying Hazard Information Sheets or visit Ready.gov/be-informed. To find supplementary information on financial preparedness, visit Ready.gov/financial-preparedness
When you come across flooded roadways: Turn Around, Don’t Drown®. Six inches of moving water may be enough to knock you off your feet. As little as 12 inches of moving water may lift a small vehicle. Flood water depth is hard to determine and may contain hidden, dangerous debris.
Find out the type of flood risk(s) likely for your area. Depending on the specific location and type of flooding, plan for your evacuation, shelter, or move to a higher location nearby.
Take action to make sure your home or business buildings are prepared for floods. Elevate the structure of new construction according to local floodplain management guidelines, so floods are less likely to damage it. Elevate critical utilities and waterproof basements. Move furniture, valuables, and important documents to a safe, elevated place.
Purchase flood insurance. Standard insurance policies do not cover flooding.
If told to evacuate, do so immediately. Never drive around barricades. Local responders use them to safely direct traffic out of flooded areas.
Seek high ground right away if you expect flooding.
If trapped in a building, go to the highest level of the building. Avoid basements and lower floors, but do not climb into a closed attic, as you may become trapped there if floodwater rises. Go onto the roof only if necessary. Signal for help.
After a flood, avoid wading in floodwater, which can contain dangerous debris and be contaminated.
Underground or downed power lines can also electrically charge the water.
Do not go into flooded buildings until an authority figure tells you it is safe to do so.
Use protective clothing like safety goggles, work gloves, hard hats, and waterproof boots when cleaning up after a flood. Be aware that snakes and other animals may be in your house.
Use a generator or other gasoline-powered machinery only outdoors and away from windows.
Be aware of the risk of electrocution. Do not touch electrical equipment if it is wet or if you are standing in water. If it is safe to do so, turn off the electricity to prevent electric shock.
Before hurricane season begins, make plans for both evacuation and sheltering in place.
Become familiar with your evacuation zone, the evacuation route, and shelter locations.
Practice going to a safe shelter for high winds, such as a safe room or ICC 500 storm shelter. The next best protection is a small, interior, windowless room in a sturdy building on the lowest level that is not subject to flooding.
Gather needed supplies for at least three days. Keep in mind each person’s specific needs, including medication. Don’t forget the needs of pets.
Keep important documents in a safe place or create password-protected digital copies.
Prepare your home for both high winds and possible flooding. Declutter drains and gutters. Install check valves in plumbing to prevent backups. Consider hurricane shutters. Trim or remove damaged tree limbs on your property. Review insurance policies.
Prepare your home for both high winds and possible flooding. Inspect your roof, windows, and doors to ensure they work properly. Trim or remove damaged tree limbs on your property.
If told to evacuate, do so immediately. Do not drive around barricades.
If trapped in a building by flooding, go to the highest level of the building. Do not climb into a closed attic. You may become trapped by rising flood water.
Purchase flood insurance. Standard insurance policies do not cover flooding.
Get regular professional reviews of new and existing construction in landslide risk areas.
Avoid building in areas at risk for a landslide, such as steep slopes or property close to cliffs, or near drainage ways or streams.
Plant ground cover and build walls to direct the mudflow around buildings.
Sign up to get emergency notifications for information on current conditions, or download emergency mobile phone applications like the Federal Emergency Management Agency (FEMA) app.
Recognize landslide warning signs, including new cracks in the ground or building foundations, soaked ground, soil moving away from foundations, changes in stream water levels, tilting objects indoors (such as doors) or outdoors (such as fences and poles), and unusual cracking or rumbling sounds.
Evacuate an area immediately after authorities tell you to. Signs of a landslide may not be visible, but the danger still exists.
Move away from the path of a landslide or debris flow. You may not be able to escape from the mudslide or debris flow once it starts, so stay away from the outer edges.
During landslide conditions, avoid rock ledges, bases of steep slopes, ravines, drainages, or narrow canyons.
After a landslide, stay away from the sliding area because more earth, rock, or debris may come loose.
Watch for flooding after a landslide, mud flow, or debris flow. Floods sometimes follow because they may be started by the same event.
Nuclear Explosion
Get inside the nearest building to avoid radiation. The best locations are underground and in the middle of larger buildings made of brick or concrete.
Stay away from the outer walls and roof. This will help provide protection from the blast, heat, and radiation of the detonation.
Stay inside for 24 hours unless local authorities provide other instructions.
Remove contaminated clothing and wipe off or wash unprotected skin if you were outside after the fallout arrived.
Protect yourself then clean any pets that were outside after the fallout arrived. Gently brush your pet’s coat to remove any fallout particles and wash your pet with soap and water.
Stay tuned to any media available for official information such as when it is safe to exit and where you should go.
Your family should stay where they are inside. Reunite later to avoid exposure to dangerous radiation. Keep your pets inside.
Before an event, identify the best shelter locations near the places where you spend the most time, such as your home, work, or school.
Maintain a 24-hour emergency supply kit in your home and office.
Keep a battery-powered or hand crank radio on hand. These will continue to function after a nuclear event, while mobile phone, text messaging, television, and internet services may not.
Do not consume food or liquids that were left uncovered outdoors and may be contaminated by fallout.
Know how the virus spreads. When a disease is novel, meaning it hasn’t been seen in humans before, there is usually not a vaccine to prevent its spread. The corona virus disease 2019 (COVID19), for example, spreads from person to person. The best way to prevent getting sick is to avoid being exposed to the virus.
Wash your hands often with soap and water for at least 20 seconds, especially after you have been in a public place and after blowing your nose, coughing, or sneezing. If soap and water are not available, use a hand sanitizer that contains at least 60 percent alcohol.
Avoid close contact with people who are sick by keeping a distance of six feet between you and other people. If possible, stay home and practice social distancing.
Wear a cloth face covering that covers your mouth and nose when going out in public.
Clean and disinfect frequently touched surfaces daily. This includes tables, doorknobs, light switches, countertops, handles, desks, phones, keyboards, toilets, faucets, and sinks.
Power Outage
Take an inventory now of the items you need that rely on electricity. Make backup plans, including relocation plans, if you have medical equipment or assistive technology devices that are dependent on power for life-sustaining purposes.
Plan for batteries and other alternatives to meet your needs when the power goes out.
Install battery-powered smoke detectors and carbon monoxide detectors in central locations on every floor of your home and outside of bedrooms. Electric detectors with battery backup are also acceptable.
Keep mobile phones and any battery-powered devices charged, and make sure you have backup charging methods such as a car charger.
Keep your car’s gas tank full. If you use your car to charge devices, do not leave the car running in a garage, partly closed space, or near a home to avoid carbon monoxide poisoning.
During a power outage, only use flashlights for lighting. Avoid using candles, as they could be a fire hazard.
Review your household power outage supplies. Ensure you have at least one flashlight with extra batteries per household member and a ready supply of nonperishable food and water.
Turn off or disconnect appliances and other equipment to protect them from quick power surges. Whenever possible, use surge protectors.
Avoid carbon monoxide poisoning. Generators, camp stoves, or charcoal grills should always be used outdoors and at least 20 feet away from windows. Never use a gas stovetop or oven to heat your home. Follow manufacturer instructions.
Check on your neighbors. Older adults and young children are especially vulnerable to extreme temperatures.
Keep perishable food cold to avoid illness. Keep a thermometer in your refrigerator and freezer to monitor the temperature. When in doubt, throw it out! Throw away any food that has been exposed to temperatures 40 degrees or higher for two hours or more, or that has an unusual odor, color, or texture.
If the power is out for more than a day, discard any medication that should be refrigerated, unless the drug’s label says otherwise.
Thunderstorm, Lightning, and Hail
When thunder roars, go indoors. When you hear thunder or see lightning, immediately get inside a sturdy building or enclosed vehicle with a metal roof.
Do not take shelter in small sheds, gazebos, dugouts, bleachers, or in a convertible car. If necessary, take shelter in a car with a metal top and sides. Do not touch anything metal.
If boating or swimming, get to land and find a sturdy, grounded shelter or vehicle immediately.
When you expect thunderstorms, plan to be near sturdy shelter. Find a safe location nearby to immediately go to at the first sound of thunder.
Cut down or trim trees that may be in danger of falling on your home.
Secure outdoor objects that could blow away or cause damage.
Charge your mobile phone before the storm arrives.
Unplug all chargers when the storm arrives.
During thunderstorms, avoid running water or using landline phones. Electricity can travel through plumbing and phone lines.
During thunderstorms, pay attention to alerts from public officials. Watch for fallen power lines and trees.
Consider buying surge protectors, lightning rods, or a lightning protection system to protect your home, appliances, and electronic devices.
In the case of a tornado watch, stay close to a safe room, shelter, or sturdy building.
Know the signs of a tornado, including a rotating funnel-shaped cloud, an approaching cloud of debris, or a loud roar—similar to a freight train.
Know where to go in your community should a tornado form. Consider building or installing your own safe room in your home or business. Every safe room that complies with FEMA guidelines will have a sign showing the entrance location.
The best shelter from a tornado is in a safe room built to FEMA P-361 standards, or a storm shelter built to ICC 500 standards. If you cannot get to a storm shelter or safe room, the next best protections are: an identified Best Available Refuge Area (BARA); or a small, interior, windowless room on the lowest level of a sturdy building that is not at risk of flooding. For more information, please visit FEMA.gov for guidance about community and residential safe rooms.
During a tornado warning, seek shelter. The National Weather Service defines “Watch” and “Warning” differently for specific hazards, as explained at Weather.gov. Generally, a watch means conditions are possible, while a warning means an event is expected, imminent, or already happening. Follow both watches and warnings carefully to know the next actions to take.
Do not stay inside mobile homes or modular structures when tornadoes threaten. They are not safe. Wear thick-soled shoes, long pants, and work gloves during cleanup.
After a tornado, take safety measures to avoid injury from debris, contaminated water, carbon monoxide poisoning, and electrocution.
If you live near or visit a coastal area, learn about the tsunami risk. Some communities disproportionately affected by tsunamis have maps with evacuation zones and routes.
Sign up for local tsunami alerts and follow the guidance provided.
Learn the signs of a potential tsunami, such as an earthquake, a loud roar from the ocean, or unusual ocean behavior, such as a sudden rise or wall of water or sudden draining showing the ocean floor.
Know and practice community evacuation plans and map out your routes from home and work. Pick shelters 100 feet or more above sea level or at least one mile inland.
Get as elevated or as far inland as possible in the event of an official or natural tsunami warning.
Stay tuned for alerts and warnings once you are in a safe, elevated place.
After a tsunami, only return home or enter flood damaged buildings when authorities tell you it is safe to do so.
Learn about community warning systems, and evacuation and shelter plans. The U.S. Geological Survey (USGS) Volcano Notification Service (VNS) also gives notifications.
Follow evacuation orders. If authorities give an evacuation order, evacuate immediately from the volcano area to avoid flying debris, hot gases, lateral blast, and lava flow.
Avoid areas downwind and river valleys downstream of the volcano. Wind and gravity will carry rubble and ash.
Take temporary shelter from volcanic ash where you are if you have enough supplies. Cover ventilation openings, and seal doors and windows.
Avoid driving in heavy ash fall. Volcanic ash may clog engines and stall vehicles. Moving parts— including bearings, brakes, and transmissions— may become damaged from abrasion.
If outside, protect yourself from falling ash that can irritate skin and injure breathing passages, eyes, and open wounds. Wear goggles and eyeglasses (instead of contact lenses) and long sleeved shirts and pants to reduce exposure to ash.
Keep several N95 respirators in your emergency kit to avoid breathing dangerous particles during and after an event. Fit test each mask to ensure a tight seal on the face. For more information about N95 respirators, visit CDC.gov.
Set up defense zones around your home and property.
Remove gas, oil, propane, and other sources of fuel from within 30 feet of your property, as well as items likely to catch on fire, such as garbage and yard waste.
Reduce vegetation from 30 to 100 feet of your property. Trim trees, remove stray branches, and clear driveways. Work with your neighbors to remove underbrush and thin trees.
Remove tree and shrub canopies that patch together within 200 feet from any structure in the neighborhood.
Use fire-resistant construction materials when renovating or building new homes. Always check and comply with local building codes and regulations before building.
Find an outdoor water source with a hose that can reach any area of your property.
Stay informed of weather conditions and other emergencies that may cause a wildfire.
Evacuate immediately once a notice has been issued to avoid your evacuation route being blocked by the wildfire.
Keep several N95 respirators in your emergency kit to avoid breathing dangerous particles during and after an event. Fit test each mask to ensure a tight seal on the face. For more information about N95 respirators, visit CDC.gov.
Listen to authorities to find out if it is safe to return home and whether water is safe to drink.
Avoid hot ash, charred trees, smoldering debris, and live embers. The ground may contain heat pockets that can burn you or spark another fire. Consider the danger to pets and livestock walking the ground.
Prepare your home to keep out the cold with insulation, caulking, and weather stripping.
Include warm clothing and blankets in your emergency supply kits.
Create an emergency supply kit for your car. Include jumper cables, sand, a flashlight, bottled water, and non-perishable snacks. Keep the gas tank full.
Install battery-powered smoke detectors and carbon monoxide detectors in central locations on every floor of your home and outside of bedrooms. Electric detectors with battery backup are also acceptable.
Limit your time outside. If you need to go outside, wear layers of warm clothing. Watch for signs of frostbite and hypothermia.
Avoid driving. If you are trapped, stay in your vehicle.
Avoid carbon monoxide poisoning. Only use generators and grills outdoors and away from windows. Never heat your home with a gas stovetop or oven.
Take refuge with family or friends if your home loses power or heat for more than a few hours, or if you do not have supplies to stay warm in your home overnight.
Use designated public shelters if no other safe refuge is available.
Check on neighbors. Older adults and young children are more at risk in extreme cold.
Evacuating & Sheltering
Many kinds of emergencies can cause you to have to evacuate. In some cases, you may have a day or two to prepare while other situations might call for an immediate evacuation. Planning is vital to making sure that you can evacuate quickly and safely no matter what the circumstances. You must find protection for you and your family when disaster strikes. Deciding whether to evacuate or to shelter in place depends on many factors, including the hazard you are facing and whether your shelter will keep you safe.
Evacuation: Local officials declare when a mandatory evacuation will occur. Local officials may also advise, but not require, evacuations.
Sheltering: The best protection in high winds, tornadoes, and many other events is to find shelter in an interior room away from windows, doors, and flood waters. This section describes things you may do to help strengthen your home against possible hazards, keeping you and your family safe.
While this section gives guidance on evacuation and shelter, you should always follow the orders and advice of local government authorities and first responders.
Before an Evacuation
Learn the types of disasters that are likely in your community and the local emergency, evacuation and shelter plans for each specific disaster.
Plan how you will leave and where you will go if you are advised to evacuate.
Check with local officials about what shelter spaces are available for this year. Coronavirus may have altered your community’s plans.
If you evacuate to a community shelter, follow the latest guidelines from the Centers for Disease Control and Prevention (CDC) for protecting yourself and your family from possible coronavirus: people over 2-years-old should use a cloth facial covering while at these facilities.
Be prepared to take cleaning items with you like masks, soap, hand sanitizer, disinfecting wipes or general household cleaning supplies to disinfect surfaces.
Maintain at least 6 feet of space between you and people who aren’t in your immediate family.
Identify several places you could go in an emergency such as a friend’s home in another town or a motel. Choose destinations in different directions so that you have options during an emergency.
If needed, identify a place to stay that will accept pets. Most public shelters allow only service animals.
Be familiar with alternate routes and other means of transportation out of your area.
Always follow the instructions of local officials and remember that your evacuation route may be on foot depending on the type of disaster.
Come up with a family/household plan to stay in touch in case you become separated; have a meeting place and update it depending on the circumstance.
Assemble supplies that are ready for evacuation. Prepare a “go-bag” you can carry when you evacuate on foot or public transportation and supplies for traveling longer distances if you have a car.
If you have a car:
Keep a full tank of gas if an evacuation seems likely. Keep a half tank of gas in it at all times in case of an unexpected need to evacuate. Gas stations may be closed during emergencies and unable to pump gas during power outages. Plan to take one car per family to reduce congestion and delay.
If you do not have a car, plan how you will leave if needed. Decide with family, friends or your local emergency management office to see what resources may be available.
During an Evacuation
Download the FEMA app for a list of open shelters during an active disaster in your local area.
Listen to a battery-powered radio and follow local evacuation instructions.
Call or email the out-of-state contact in your family communications plan. Tell them where you are going.
Secure your home by closing and locking doors and windows.
Unplug electrical equipment such as radios, televisions and small appliances. Leave freezers and refrigerators plugged in unless there is a risk of flooding. If there is damage to your home and you are instructed to do so, shut off water, gas and electricity before leaving.
Leave a note telling others when you left and where you are going.
Wear sturdy shoes and clothing that provides some protection such as long pants, long-sleeved shirts and a hat.
Check with neighbors who may need a ride.
Follow recommended evacuation routes. Do not take shortcuts, they may be blocked.
Be alert for road hazards such as washed-out roads or bridges and downed power lines. Do not drive into flooded areas.
After an Evacuation
If you evacuated for the storm, check with local officials both where you’re staying and back home before you travel.
If you are returning to disaster-affected areas, after significant events prepare for disruptions to daily activities and remember that returning home before storm debris is cleared is dangerous.
Let friends and family know before you leave and when you arrive.
Charge devices and consider getting back-up batteries in case power-outages continue.
Fill up your gas tank and consider downloading a fuel app to check for outages along your route.
Bring supplies such as water and non-perishable food for the car ride.
Avoid downed power or utility lines, they may be live with deadly voltage. Stay away and report them immediately to your power or utility company.
Only use generators outside and away from your home and NEVER run a generator inside a home or garage or connect it to your home’s electrical system.
Sheltering is appropriate when conditions require that you seek protection in your home, where you work or other location when other emergencies arise. The length of time you are required to take shelter may be short, such as during a tornado warning, or during a pandemic. In all cases, it is important that you stay informed and follow the instructions of local authorities.
During extended periods of sheltering you will need to manage water and food supplies to make sure you and your family have what you need to get by. Read more about managing water and managing food.
Choosing to take shelter is necessary in many emergencies. This can mean: Stay-At- Home, Going to a Mass Care Shelter, or Sheltering in Place. Here’s the distinction:
Stay-at-Home
Remain indoors as much as possible and try to only leave your home when necessary. You can still use outdoor spaces such as patios, porches and yards.
Outdoor activities such as walking, jogging and exercise are fine if you practice social distancing (maintaining six feet away from the next person).
Mass care shelters provide life sustaining services to disaster survivors. Even though mass care shelters often provide water, food, medicine and basic sanitary facilities, you should plan to take your emergency supply kit with you so you will have the supplies you need. Mass care sheltering can involve living with many people in a confined space, which can be difficult and unpleasant.
Check with local officials about what shelter spaces are available. Coronavirus may have altered your community’s plans.
Maintain at least 6 feet of space between you and people who aren’t in your immediate family.
Search for open shelters by texting SHELTER and a ZIP code to 43362. Example: Shelter 01234 (standard rates apply). Learn more by visiting: http://www.disasterassistance.gov/.
Sheltering in Place
Whether you are at home, work or anywhere else you frequent regularly, there may be situations when it’s best to stay where you are and avoid any uncertainty outside.
Here are some indicators and steps to take if the situation arises:
Use common sense and available information to assess the situation and determine if there is immediate danger.
If you see large amounts of debris in the air, or if local authorities say the air is badly contaminated you may want to take this kind of action.
Here are some tips for sheltering in place:
Local authorities may not immediately be able to provide information on what is happening and what you should do.
Watch TV and listen to the radio or check the Internet often for official news and instructions as they become available.
Bring your family and pets inside.
Lock doors, close windows, air vents and fireplace dampers.
Turn off fans, air conditioning and forced air heating systems.
Take your emergency supply kit unless you have reason to believe it has been contaminated.
Go into an interior room with few windows if possible.
Seal all windows, doors and air vents with thick plastic sheeting and duct tape. Consider measuring and cutting the sheeting in advance to save time.
Cut the plastic sheeting several inches wider than the openings and label each sheet.
Duct tape plastic at corners first and then tape down all edges.
Be prepared to improvise and use what you have on hand to seal gaps so that you create a barrier between yourself and any contamination.
“Sealing a room” is considered a temporary protective measure to create a barrier between you and potentially contaminated air outside. This type of sheltering in place requires pre-planning, by purchasing plastic sheeting and duct tape that you would keep in your emergency supply kit.
A little bit of excess knowledge can be the difference between life and death.
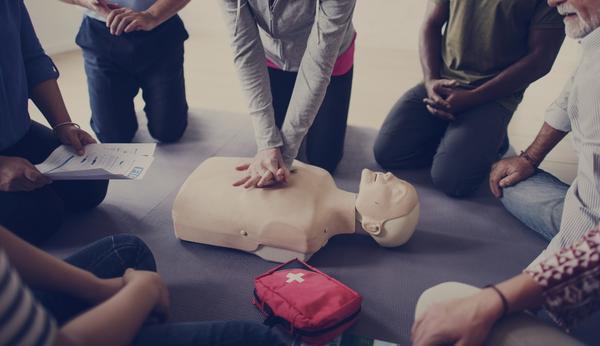
CPR is a life saving technique and can be performed by anyone and everyone! If someone collapses in front of you, knowing basic evaluation and CPR techniques can save lives!
First aid! It is quite simple if you know how to do it. Remember to wash the wound, applying a disinfectant and bandaging properly to allow movement at joints.
A basic knowledge of common communicable diseases. Sanitation and hygiene becomes ten folds easier if you know what to control to prevent diseases!
Hand washing technique is a must for everyone. There is a proper 7 step pattern for hygienic hand wash. It can be looked up in YouTube. Simple soap and water can prevent most of gastro problems.
Injuries are practically inevitable in emergency situations. There’s a chance you get hurt by whatever’s causing the emergency; for instance, you could get burned in a fire, or you could get struck by toppling debris during an earthquake. But injuries are also sustained during the panic that ensues in an emergency. In the rush to get away from danger, you could sprain your ankle or suffer an open wound.
Here are 10 first aid “must-knows” that you can use to treat a broad array of injuries:
Remember the “Three P’s.”
Check the scene for danger before you provide help.
To treat cuts and scrapes, apply gentle pressure, disinfectant, and bandages.
To treat sprains, apply ice and compression at intervals and keep the limb elevated.
To treat heat exhaustion, use cool fluids, cool cloths, and shade.
To treat hypothermia; use warm fluids and warm covering.
To treat burns, determine the burn type and severity. Cover the wound with loose cloth to prevent infection.
Use an EpiPen to treat allergic reactions.
To treat fractures, keep the fractured area stable and immobilized, and apply a cold pack.
It’s important that you commit these 10 golden rules to memory. Even if you’re not injured, you might encounter someone who is, and who needs treatment.
Always attempt to seek professional medical help for injured persons. First responders are not always readily available during emergency situations, and if that’s the case, do your best to provide what treatment you can until help arrives. But never forget that serious injuries always require more advanced treatment, and you should do your best to get the injured person to professional caregivers.
Nonetheless, these simple first aid procedures can go a long way in helping someone who’s injured, and all you need to do is use a few materials in your survival kit and apply them in right manner. Read through these detailed guides on all 10 items.
The “Three P’s”
The “Three P’s” are the primary goals of first aid. They are:
Preserve life
Prevent further injury
Promote recovery
These goals might seem overly simple, but they’re simple on purpose. When someone is injured, it’s all-too-easy to panic and forget what you need to do to provide assistance. The Three P’s remind you of the very basics: do what you can to save the person’s life; do what you can to keep them from sustaining further injuries; do what you can to help them heal.
2. Check the Scene for Danger
Before you provide help to an injured person, it’s important that you check the scene for danger. You don’t want to get yourself injured, too. This isn’t a cowardly precaution. The fact of the matter is this: if you get injured, you won’t be able to help someone else who’s injured. So before you rush to help someone, take a moment to analyze the area and spot anything that could injure you.
For example, there might be a terrible storm outdoors, and you spot someone outside who’s injured and who can’t make it to shelter. Before you go running outside to help them, look for hazards. Are strong winds hurling debris? Are there any trees or structures that look as if they’re about to fall? Are there downed power lines? Is there floodwater?
Once you’ve assessed these dangers, you can better strategize how to reach and rescue the injured person.
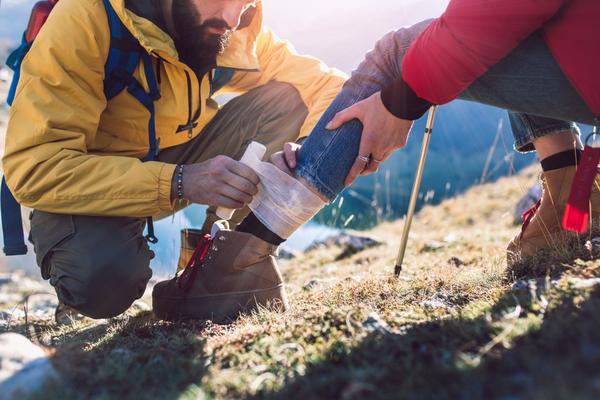
3. Treating Cuts and Scrapes
Blood is a vital component of our bodies. When someone is bleeding, you want to prevent as much blood from leaving their body as possible. Try and find a clean cloth or bandage. Then:
Apply gentle pressure for 20 to 30 minutes.
Clean the wound by gently running over it. Avoid using soap on an open wound.
Apply antibiotic to the wound, like Neosporin.
Cover the wound with a bandage.
If someone has a nosebleed, have the person lean forward. Press a cloth against the nostrils until the blood flow stops.
The body is usually very quick at patching up small cuts and scrapes. But deeper wounds may require medical attention. With deep wounds:
Apply pressure.
Don’t apply ointments. Cover the area with loose cloth to prevent contaminants from infecting the wound.
Seek medical attention as soon as possible.
4. Treating Sprains
Sprains are usually an unalarming injury, and most of the time they’ll heal on their own. But there are steps you can take to ease the swelling. Swelling is caused by blood flow to an injured area. You can reduce swelling by applying ice. Ice restricts the blood vessels, which reduces blood flow.
Keep the injured limb elevated.
Apply ice to the injured area. Don’t apply ice directly to the skin. Wrap it in a cloth or put ice in a plastic bag.
Keep the injured area compressed. Put it in a brace or tightly wrap it. Don’t wrap it so tight that it’ll cut off circulation.
Ice for a while. Then compress. Repeat at intervals.
Make sure the injured person avoids putting weight on the injured limb.
5. Treating Heat Exhaustion
Heat exhaustion occurs due to prolonged exposure to high temperatures, especially when the person is doing strenuous activities or hasn’t had enough water. Symptoms of heat exhaustion include:
Cool, moist skin
Heavy sweating
Dizziness
Weak pulse
Muscle cramps
Nausea
Headaches
To treat someone with heat exhaustion:
Get the person to a shaded area that’s out of the sun.
If there are no shaded areas available, keep the person covered by any available materials that can block sunlight.
Give the person water and keep them hydrated.
Place a cool cloth on their forehead to lower their body temperature.
6. Treating Hypothermia
Hypothermia is caused by prolonged exposure to cold temperatures. It begins to occurs when your body temperature drops below 95 degrees Fahrenheit.
Symptoms of hypothermia include:
Shivering
Slurred speech or mumbling
Week pulse
Weak coordination
Confusion
Red, cold skin
Loss of consciousness
To treat hypothermia:
Be gentle with the afflicted person. Don’t rub their body and don’t move their body in too jarring of a way; this could trigger cardiac arrest.
Move the person out of the cold, and remove any wet clothing.
Cover the person with blankets and use heat packs. Don’t apply heat directly to the skin because this could cause major skin damage.
Give the person warm fluids.
If you set the person on the ground, be aware that the ground may also be a cold source. Place warm materials on the ground that the person is going to lay on.
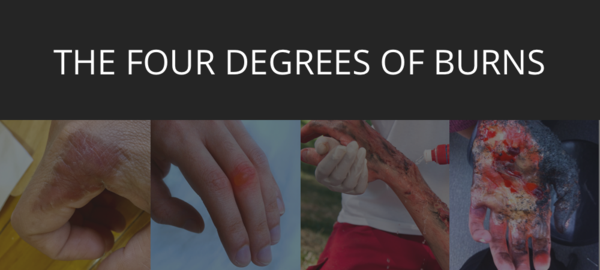
7. Treating Burns
Before you apply treatment to burns, you need to identify the burn type and the severity of the burn. There are four kinds of burns:
First-degree burn: Only the outer layers of skin are burnt. The skin is red and swollen, and looks similar to a sunburn.
Second-degree burn: Some of the inner layer of skin is burnt. Look for blistering skin and swelling. This is usually a very painful type of burn.
Third-degree burn: All of the inner layer of skin is burnt. The wound has a whitish or blackened color. Some third-degree burns are so deep, there might not be any pain because the nerve endings are destroyed.
Fourth-degree burn: A burn that has penetrated all tissues up to the tendons and bones.
Additionally, there are two kinds of burn severities: a minor burn and a major burn.
Minor burn: First-degree burns and mild second-degree burns.
Major burn: Moderate second-degree burns to fourth-degree burns.
Minor burns don’t usually need extensive treatment, but you could:
Run cool water over the afflicted area (avoid icy or very cold water).
Don’t break any blisters.
Apply moisturizer over the area, like aloe vera.
Keep the burned person out of sunlight.
Have the burned person take ibuprofen or acetaminophen for pain relief.
Major burns are very serious injuries that require medical assistance. To help someone who has suffered from a major burn:
Do not apply ointments.
Cover wound with loose materials to prevent contaminants from infecting it.
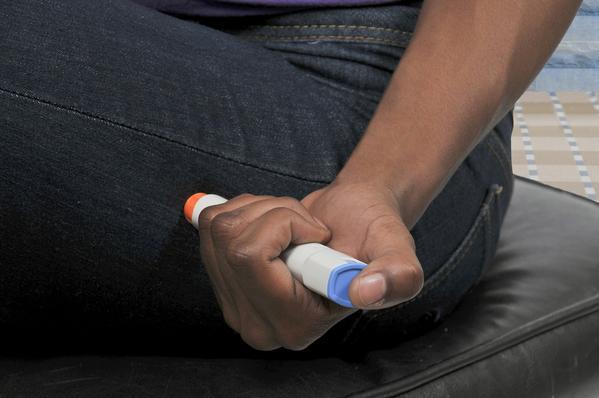
8. Allergic Reactions
Allergic reactions occur when your body is hypersensitive to a foreign substance. Bee stings, certain foods, or drug ingredients can cause allergic reactions. Anaphylaxis is a life-threatening allergic reaction that can be caused by all of those mention allergens.
The best way to treat an allergic reaction is to use an EpiPen. EpiPen, or “epinephrine autoinjector,” is a small and ergonomic needle that’s used to inject epinephrine (adrenaline) into someone suffering greatly from an allergic reaction. The epinephrine usually subdues the effects of the allergic reaction.
If someone is suffering from an allergic reaction:
Keep the person calm. Ask if they use an EpiPen and have one with them.
Have the person lie on their back. Keep their feet elevated 12 inches.
Make sure the person’s clothing is loose so they’re able to breathe.
Avoid giving them food, drink, or medicine.
If appropriate, learn how to inject an EpiPen in someone having a reaction.
Wait 5-15 minutes after using an EpiPen. If the allergic reaction isn’t subdued, a second dose may be required.
9. Treating Fractures
Sometimes it’s very easy to tell if someone has suffered a fractured bone. But sometimes it’s not. If you suspect someone of having a fracture:
Don’t try to straighten a fractured limb.
Use a splint or padding to stabilize the area and keep it from moving.
Apply a cold pack to the area. Don’t apply it directly to the skin. Wrap it in a cloth or put it in a plastic bag.
Keep the area elevated, if possible.
Give the person an anti-inflammatory drug, like ibuprofen.
10. Performing CPR
CPR stands for cardiopulmonary resuscitation. CPR is used to restore breathing and blood circulation to an unresponsive person. CPR is an incredibly important procedure that can save lives. But learning CPR is an intensive procedure that requires some training, which is usually in the form of a day-long class. The American Red Cross offers CPR certification classes across the nation. Go to Redcross.org for more information.
Prepare Yourself with the Right Gear
The methods listed above are not very difficult to do and they don’t require medical training—but they can save someone’s life or prevent an injured person from sustaining serious injuries or infections. Make sure that your stash of survival gear includes a first aid kit, and be sure to refill your first aid kit every year as its supplies dwindle or expire.
The essential first aid kit should include:
Anti-bacterial wipes
Painkillers
Gauze pads
Sunscreen
Medical gloves
Medical instrument kit
Sling
Burn gel
Antibiotic ointment
Antiseptic wipes
First aid instructions
Tourniquet
Building a Kit
In case of an emergency/disaster, you may need to survive on your own for several days. Being prepared means having your own food, water and other supplies to last for several days. A disaster supplies kit is a collection of basic items your household may need in the event of an emergency.
Make sure your emergency kit is stocked with the items on the checklist below. Download a printable version to take with you to the store. Once you take a look at the basic items consider what unique needs your family might have, such as supplies for pets or seniors.
Basic Disaster Supplies Kit
To assemble your kit store items in airtight plastic bags and put your entire disaster supplies kit in one or two easy-to-carry containers such as plastic bins or a duffel bag.
A basic emergency supply kit could include the following recommended items:
Water (one gallon per person per day for several days, for drinking and sanitation)
Food (at least a three-day supply of non-perishable food)
Battery-powered or hand crank radio and a NOAA Weather Radio with tone alert
Non-prescription medications such as pain relievers, anti-diarrhea medication, antacids or laxatives
Prescription eyeglasses and contact lens solution
Infant formula, bottles, diapers, wipes and diaper rash cream
Pet food and extra water for your pet
Cash or traveler’s checks
Important family documents such as copies of insurance policies, identification and bank account records saved electronically or in a waterproof, portable container
Sleeping bag or warm blanket for each person
Complete change of clothing appropriate for your climate and sturdy shoes
Fire extinguisher
Matches in a waterproof container
Feminine supplies and personal hygiene items
Mess kits, paper cups, plates, paper towels and plastic utensils
Paper and pencil
Books, games, puzzles or other activities for children
Maintaining Your Kit
After assembling your kit remember to maintain it so it’s ready when needed:
Store boxed food in tightly closed plastic or metal containers.
Replace expired items as needed.
Re-think your needs every year and update your kit as your family’s needs change.
Kit Storage Locations
Since you do not know where you will be when an emergency occurs, prepare supplies for home, work and cars.
Home: Keep this kit in a designated place and have it ready in case you have to leave your home quickly. Make sure all family members know where the kit is kept.
Work: Be prepared to shelter at work for at least 24 hours. Your work kit should include food, water and other necessities like medicines, as well as comfortable walking shoes, stored in a “grab and go” case.
Car: In case you are stranded, keep a kit of emergency supplies in your car.
Building a Kit for persons with Disability
In addition to having your basic survival supplies, an emergency kit should have items to meet your individual needs in various emergencies. Consider the items you use every day and which ones you may need to add to your kit.
Tips for People Who are Deaf or Hard of Hearing
Weather radio (with text display and a flashing alert)
Extra hearing-aid batteries
Pen and paper (in case you have to communicate with someone who does not know sign language)
Battery operated lantern to enable communication by sign language or lip reading, especially when the electricity is out and it’s dark.
Tips for People Who are Blind or Have Low Vision
Mark emergency supplies with Braille labels or large print. Keep a list of your emergency supplies and where you bought them on a portable flash drive or make an audio file that is kept in a safe place where you can access it.
Keep communication devices for your particular needs, such as a Braille or deaf-blind communications device as part of your emergency supply kit.
Tips for People with Speech Disability
If you use an augmentative communications device or other assistive technologies plan how you will evacuate with the devices or how you will replace equipment if it is lost or destroyed. Keep model information and note where the equipment came from (Medicaid, Medicare, private insurance, etc.).
Plan how you will communicate with others if your equipment is not working, including laminated cards with phrases and/or pictogram.
Individuals with Intellectual or Developmental Disabilities
Keep handheld electronic devices charged and loaded with videos and activities.
Purchase spare chargers for electronic devices and keep them charged.
Include sheets and twine or a small pop-up tent (to decrease visual stimulation in a busy room or to provide instant privacy).
Consider a pair of noise-canceling headphones to decrease auditory stimuli.
Have comfort snacks available.
Tips for People with a Mobility Disability
If you use a power wheelchair have a lightweight manual chair available as a backup if possible.
Show others how to assemble, disassemble and operate your wheelchair.
Purchase an extra battery for a power wheelchair or other battery-operated medical or assistive technology devices. If you can’t purchase an extra battery, find out what agencies, organizations or local charitable groups can help you buy one. Keep extra batteries charged at all times.
Consider keeping a patch kit or can of sealant for flat tires and/or extra inner tube if wheelchair or scooter is not puncture proof.
Keep an extra mobility device such as a cane or walker if you use one.
Keep a portable air pump for wheelchair tires.
If you use a seat cushion to protect your skin or maintain your balance and you must evacuate, consider keeping an extra cushion on hand.
Communicate with neighbors who can assist you if you need to evacuate the building.
Tips for Individuals with Alzheimer’s and Related Dementia
Do not leave the person alone. Even those who aren’t prone to wandering away may do so in unfamiliar environments or situations.
If evacuating, help manage the change in environment by bringing a pillow and blanket or other comforting items they can hold onto.
When at a shelter, try to stay away from exits and choose a quiet corner.
If there is an episode of agitation, respond to the emotions being expressed. For example, say “You’re frightened and want to go home. It’s ok. I’m right here with you.”
Additional Items
Several days supply of prescription medicines
A list of all medications, dosage and any allergies
Extra eyeglasses, contacts, hearing aids and batteries
A backup supply of oxygen
A list of the style and serial number of medical devices (include special instructions for operating your equipment if needed)
Copies of insurance and Medicare cards
Contact information for doctors, relatives or friends who should be notified if you are hurt
Pet food, extra water, collar with ID tag, medical records and other supplies for your service or support animal
DWMT (Demonstration, Workshop, Training and Mock Drills)
We customize and organize basic, elementary and elaborate Workshops for Preparedness for Emergencies and Disasters as per the needs of the clients’. We carry out demonstrations for each and every aspect of it, based on our mutual agreement/ proposal. We train the individuals/ organizations for the same.
We do conduct Preparedness Drills for the same post/pre training as and when required or as per the agreement.
Certification
We provide certificates for the courses/campaigns that we run (as and when applicable) post completion of the same by the applicant.
Hey People! We’re happy to announce that on 08/19/2021, Disability Dream Weavers accomplished a successful Disaster Preparedness campaign ‘AWAKE’ in collaboration with ABC at the famous Boxing Legend Archie Moore’s ABC Youth Foundation. DiDW carried out a Disaster Preparedness workshop and distributed emergency Go-Bags for the kids in their premises.
Not only did the kids learn a lot about Disaster Preparedness but also were really excited to grab their emergency Go-Bags. I really want to thank Billy and Terence for taking the initiative for the kids in our community.